

How to make a release#
The release manager makes the release, assisted by the release manager of the previous release, or if that person is not available, another previous release manager. Perform the steps listed below with two persons, to reduce the risk of error.
Note
The previous release manager ensures the current release manager has the required administrative permissions to make the release. Consider the following services: esmvalcore-feedstock for making the conda-forge package, and esmvaltool.dkrz.de for uploading recipe runs for the ESMValTool release.
Ask someone with administrative permissions to add you to the @release-managers team because only members of this team have permission to create tags in the GitHub repository.
If the automation fails, you may need access to the following services: PyPI, DockerHub, readthedocs.
The release of ESMValCore is tied to the release of ESMValTool. The detailed steps can be found in the ESMValTool documentation. To start the procedure, ESMValCore gets released as a release candidate to test the recipes in ESMValTool. If bugs are found during the testing phase of the release candidate, make as many release candidates for ESMValCore as needed in order to fix them.
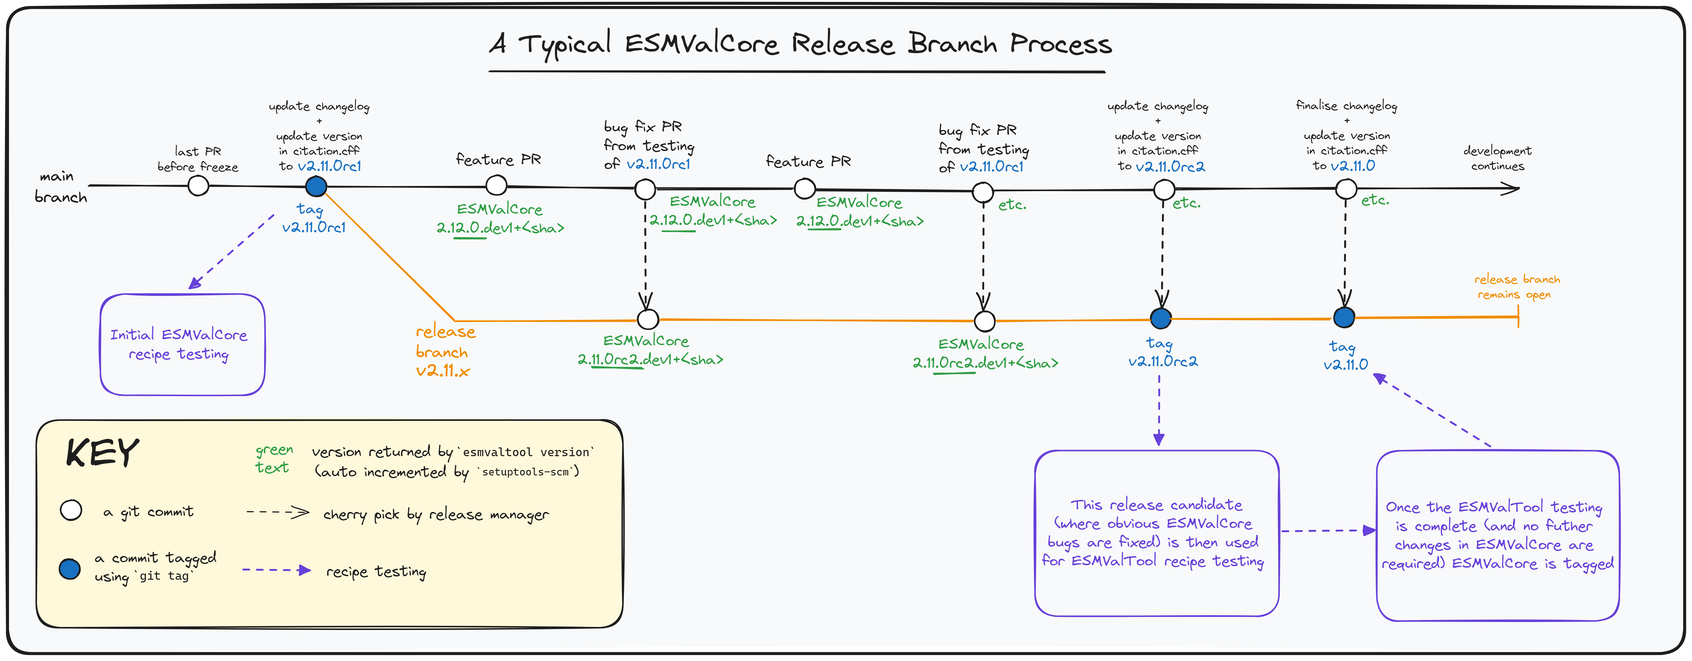
Fig. 1 Example of a release timeline for ESMValCore (in this case for 2.11.0)#
To make a new release of the package, be it a release candidate or the final release, follow these steps:
1. Check that all tests and builds work#
Check that the
nightlytest run on CircleCI was successful.Check that the GitHub Actions test runs were successful.
Check that the documentation builds successfully on readthedocs.
Check that the Docker images are building successfully.
All tests should pass before making a release (branch).
2. Increase the version number#
The version number is automatically generated from the information provided by
git using setuptools-scm, but a
static version number is stored in CITATION.cff.
Make sure to update the version number and release date in CITATION.cff.
See https://semver.org for more information on choosing a version number.
Make a pull request and get it merged into main. If updated after the release
branch is created, cherry pick it into the release branch.
3. Add release notes#
Use the script
esmvaltool/utils/draft_release_notes.py
to create create a draft of the release notes.
This script uses the titles and labels of merged pull requests since the
previous release date.
Review the results, and if anything needs changing, change it on GitHub and
re-run the script until the changelog looks acceptable.
Copy the result to the file doc/changelog.rst.
Ensure that any pull request labelled as issue introduced since last release is listed on the same line as the pull request that introduced the issue. This label is intended for pull requests that fix a mistake that was introduced after the last release and therefore is not a bug that is present in any released version of the code.
Open a discussion to allow members of the development team to nominate pull requests as highlights. Add the most voted pull requests as highlights at the beginning of changelog. After the highlights section, list any backward incompatible changes that the release may include. The backward compatibility policy lists the information that should be provided by the developer of any backward incompatible change. Make sure to also list any deprecations that the release may include, as well as a brief description on how to upgrade a deprecated feature.
Make a pull request and get it merged into main. If updated after the release
branch is created, cherry pick it into the release branch.
4. Make the (pre-)release on GitHub#
Do a final check that all tests on CircleCI and GitHub Actions completed successfully. Then click the releases tab and create the new release.
Create a tag corresponding to the release candidate or final release, e.g.
v2.1.0rc1 or v2.1.0. You can add a link to the relevant changelog in the
release notes.
Tick the This is a pre-release box if working with a release candidate.
If this is the first release candidate, create the release and tag off the
main branch. We do this to inform
setuptools-scm about the release,
so that it increases the version number in main. All subsequent release
candidates and the final release are created off the release branch.
5. Create a release branch#
Create a branch off the first release candidate tag and push it to GitHub.
This step only needs to be performed once for every minor release.
For the v2.1 release, the command to create the release branch would be:
git checkout -b v2.1.x tags/v2.1.0rc1, where v2.1.0rc1 is the tag of the
first release candidate.
Release branches must be named vX.Y.x where X is the major and Y is
the minor version number of the release to ensure setuptools-scm provides the
correct version number for the release.
6. Create and upload the PyPI package#
The package is automatically uploaded to the PyPI by a GitHub action. Note that for security reasons, the upload needs to be approved by someone from the ESMValGroup/technical-lead-development-team who is not the author of the release.
If the automatic build and upload has failed for some reason, do it manually by following these instructions:
Check out the tag corresponding to the release, e.g.
git checkout tags/v2.1.0Make sure your current working directory is clean by checking the output of
git statusand by runninggit clean -xdfto remove any files ignored by git.Install the required packages:
python3 -m pip install --upgrade build twineBuild the package:
python3 -m buildThis command should generate two files in thedistdirectory, e.g.ESMValCore-2.3.1-py3-none-any.whlandESMValCore-2.3.1.tar.gz.Upload the package:
python3 -m twine upload dist/*You will be prompted for an API token if you have not set this up before, see here for more information.
You can read more about this in Packaging Python Projects.
7. Create the Conda package#
The esmvalcore package is published on the conda-forge conda channel.
This is done via a pull request on the esmvalcore-feedstock repository.
To publish a release candidate, you have to open a pull request yourself. An example for this can be found here. Make sure to use the rc branch as the target branch for your pull request and follow all instructions given by the linter bot. The testing of ESMValTool will be performed with the published release candidate.
For the final release, this pull request is automatically opened by a bot. An example pull request can be found here. Follow the instructions by the bot to finalize the pull request. This step mostly contains updating dependencies that have been changed during the last release cycle. Once approved by the feedstock maintainers they will merge the pull request, which will in turn publish the package on conda-forge some time later. Contact the feedstock maintainers if you want to become a maintainer yourself.
8. Check the Docker images#
There is one main Docker container images available for ESMValCore on Dockerhub:
esmvalgroup/esmvalcore:stable, built from docker/Dockerfile, this is a tag that is always the same as the latest released version. This image is only built by Dockerhub when a new release is created.
In addition to the image mentioned above, there is an image available
for every release (e.g. esmvalgroup/esmvalcore:v2.5.0).
When working on the Docker images, always try to follow the
best practices.
After making the release, check that the Docker image for that release has been built correctly by
checking that the version tag is available on Dockerhub and the
stabletag has been updated,running some recipes with the
stabletag Docker container, for example one recipe for Python, NCL, and R,running a recipe with a Singularity container built from the
stabletag.
If there is a problem with the automatically built container image, you can fix the problem and build a new image locally. For example, to build and upload the container image for v2.5.0 of the tool run:
git checkout v2.5.0
git clean -x
docker build --pull -t esmvalgroup/esmvalcore:v2.5.0 . -f docker/Dockerfile
docker push esmvalgroup/esmvalcore:v2.5.0
(when making updates, you may want to add .post0, .post1, .. to the version number to avoid overwriting an older tag) and if it is the latest release that you are updating, also run
docker tag esmvalgroup/esmvalcore:v2.5.0 esmvalgroup/esmvalcore:stable
docker push esmvalgroup/esmvalcore:stable
Note that the docker push command will overwrite the existing tags on
Dockerhub, but the previous container image will remain available as an
untagged image.